

The WP-Sticky WordPress plugin allows you to easily choose to “stick” certain posts at the top of your blog. This can also be done via code, as I explained in a post a few months ago where I wrote about some code that you can add to your index.php template file that will keep the latest post in your feature category at the top of your homepage. However, both the plugin and the code have advantages and disadvantages.
The coding method has the following advantages:
- By putting all your best posts in one category, you can easily highlight these posts in a number of places, like in the sidebar or on its own category page, and of course as a feature article.
- You can give the feature post its own styling, like a different background color, which helps it stand out even more.
- You don’t need a plugin.
However, this method also has the following disadvantages:
- You need to create a unique category for your feature posts. Sometimes you just want to highlight certain posts without putting them in their own category. Also, your features posts will end up needing two instead of one: “Feature,” and another category that really describes the type of article.
- With the code I gave, the feature post will appear at the top of every main page on your blog. What I mean is that if you click on “previous entries” or something like that at the bottom of the first page of your blog, the feature post will still appear at the top on the second page. This can be confusing to readers who will wonder if they have actually browsed to a new page.
- You need to hack your template file, which isn’t for everybody.
So I decided to try out another option, and settled on WP-Sticky by Lester Chan. The explanation on the plugin page and in the readme file is not clear, but I eventually came across a better explanation here.
After installing the plugin, it creates an additional box on the Write Post page at the bottom of the right-hand sidebar called Post Sticky Status. There, you have three options: Announcement, Sticky, and Normal.
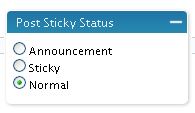
If you select Announcement, that post will stay at the top of your blog forever, or at least until you define another post as an Announcement or change the post’s status to Normal. If you select Sticky, the post will stay at the top of your blog for the duration of the day on which you posted it, after which it will return to its place in the chronological order. This is good if you post multiple posts on one day, but want to highlight one of them by sticking it to the top of your blog.
Update February 20, 2008: Announcements can be styled! Here’s how:
You can style your feature posts as follows:
- Find the line in your index.php file that says the following:
<div class="post">
Note that it may say something a bit different, like it may have a different class name. Basically, it’s the code that appears before all the content related template tags in the loop, somewhere around line 13. - Replace that line with the following:
<div class="post"<?php if (is_announcement()) {echo " id="announcement"";} ?>>
That code tells WordPress that if the post is an Announcement post, it should have a class of “post” and an id of “announcement.” This way the post keeps the styling of “post” and gets additional styling of “announcement. - Add the following style to your style.css file:
#announcement {}
Put in the squiggly brackets whatever styles you want. Make the title a different size, color, give it a different background color, even add images like a “Feature” badge.
The disadvantages to the WP-Sticky WordPress plugin are:
You cannot give Announcement or Sticky posts their own styling.- You need to use a plugin.